Every webmaster in the world understands the importance of SEO audit. It is a process that makes sure that a website is healthy and has a good standing in Google’s eyes.
To ensure your website’s health, it is very important that you conduct a detailed SEO audit. The process includes several steps from technical to non-technical.
To perform a detailed SEO audit, you don’t have to be an expert of SEO but having some basic knowledge about SEO is a plus.
The Objective of SEO Audit
Every task has an objective and so does the SEO audit. Without the purpose, you will not be able to get much out of an SEO assessment.
Every website has different objectives and needs, keeping that in mind, you may have to change the purpose of your SEO assessment (If needed).
For example, an e-commerce website’s objective is to sell products, so the SEO audit’s goal would be to make the website better in a way that increases the sale.
On the other hand, a software company’s objective is to gain more leads which they can turn into customers. So, the SEO audit’s goal would be to make the website better in a way that increases the query.
You can clearly see, the website’s objectives can change the purpose of SEO audit. Therefore, it is necessary to define an objective of your SEO audit first to get the maximum results.
Main Tools required for SEO Audit
In this whole SEO audit process, I will be using different SEO tools. Here is a list of those tools:
- Google Page Speed Insight
- GT Metrix
- Google Search Console
- Google Analytics
- Google Mobile Friendliness Checker
- Google’s Structured Data Testing Tool
- Screaming Frog
- Web Page Word Counter
- Ahrefs
All these tools are required to conduct the whole SEO audit. These tools will help you see your website’s anatomy in detail. The list of tools will also help you figure out a website ambiguities within minutes.
SEO Audit – Step by Step Process
-
Make sure that only one version of the website is browseable
The very first step of SEO audit is to make sure that only one version of your website is crawlable. You need to think of all possible ways someone could type your website URL into a browser (Chrome, Mozilla etc).
For example:
- http://example.com
- http://www.example.com
- https://example.com
- https://www.example.com
Here, you have to confirm that only one version is reachable for a user or search engine bot in a browser. If more than one version is reachable then duplicity issue will arise. Why?
Because Google and other search engines consider all above four versions of your website as different. For a human, the above four versions may look the same but not for search engines. This is why it is important to redirect (301) all different URL versions to one version.
For example, if you want to keep https://example.com accessible for users and search engines then all three versions i.e.
- http://www.example.com
- http://example.com
- https://www.example.com
should redirect to https://example.com version.
Suggestion: I would suggest testing some other website URLs as well to ensure 301 that redirect is implemented properly.
-
Check whether your site is indexed in Google
The next step of the SEO audit is to confirm whether your website is indexed in Google or not. If your website is not indexed then you will not get any rankings and traffic ever. So this step is very important to perform.
To check your website’s index status, follow these simple steps:
Step 1: Go to www.google.com
Step 2: search your website with “site:” operator. Like this – site:novage.com.sg
Step 3: Check for your site, your home page should be visible at the first place.
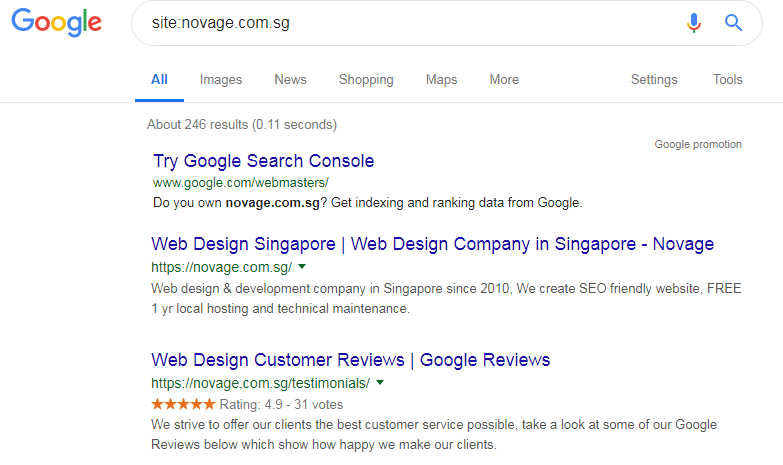
Alternatively, you can also login to Google search console to check website index related issues.
For that, simply go to Search Console and then head to Coverage. In this GSC section, you will see all crawl and index related issues of your site. From here you can check which page is indexed, which is not and how to fix them.
If your site is indexed in Google then you are all set to move to next SEO audit item. If your site is not indexed then follow the 4th step.
Step 4: It may be possible that your site is not indexed by Google.
Possible reasons could be that:
- Your website is new
- Website is set noindex by meta robots tag
- Website is set noindex by x‐robots‐tag in HTTP header
- Issues within .htaccess file
To check for these issues you need to look into your website’s header.php, .htaccess file, or server access file.
It is not possible in this SEO audit to explain the complete solution for this issue, thus I would suggest you to check this Google Developer reference article. With this helpful resource, you can fix the indexation issues of your site.
Suggestion: If you are not sure how to do it then it’s better to consult a developer. Wrong placement of serving directives may cause other issues in your website.
-
Check for HTTPS Protocol
Some years ago, it was not important to implement HTTPS for sites that were not asking for sensitive information like credit/debit card details etc from users.
But last year in July, Google started marking all kinds of non-HTTPS sites as not secure. That means it is now vital for every website to put HTTPS into operation.
Another reason of moving to HTTPS is the ranking boost. Since 2014, Google has included secure HTTP protocol into ranking signals list. This big change makes it quite clear to shift your website to HTTPS protocol to leverage the ranking advantage.
Here is a simple guide from Google that explains all the necessary steps you need to take for HTTPS implementation.
-
Check for URL redirection
Improper URL redirection can confuse search engines as well as users. That’s why it is vital to cross-check whether 301 or other redirections are implemented properly.
To check this you can use this Bulk URL Redirection check tool. All you need to do is put the URLs that you want to check into the text field and hit the check button.
Suggestion: if you are not confident enough, try getting the help of a developer for fixing this issue. Wrong redirection methods can cause other problem in your site.
-
Check for HTTP Code status
You should make sure that every website page is returning the proper HTTP response code. For example, you may have seen 404 (not found) errors on websites, in some cases when HTTP status code is not properly passed, the soft 404 error occurs. So, these things need to be checked by you.
In most of the cases, the webpage should return the HTTP code 200 (ok) which denotes that your webpage is fine.
But in some cases, your website’s pages might return different status codes such as 500 (internal server error), 502 (bad gateway), 400 (bad request) etc.
These codes tell the problem about a page, through the code status you can figure out whether server-end is not responding or client-end is not responding while loading a page.
To check the HTTP response you can either use Bulk HTTP status check tool or Screaming Frog tool.
-
Check for canonicalization issue
Inappropriate Canonical tag implementation can cause serious harm to your website. To make sure your website stays away from this dilemma you need to verify whether the canonical tag is implemented rightly.
You may already know that canonical tag is used to tell the search engine that a specific web URL represents as a copy of the master page.
For example, let’s take the same example we discussed while checking 301 redirection.
If your website URL is http://www.example.com then you need to put rel=canonical tag on URL http://example.com which states the original webpage is the 1st one and 2nd one is just a copy.
For a better understanding of this issue, I would suggest you to check Moz’s excellent canonical guide.
-
Check for missing Meta title and description tags
Meta title and description indirectly play an important role in a website’s rankings. Both things help in improving the CTR of a website, so you should make sure that all the web pages on your website have Meta title and description tag with content.
Also, I would advise you to keep the Meta title under 60 character limits and description under 155 character limits.
To check every page’s Meta title and description, follow the simple steps:
Step 1: Download Screaming Frog tool and install it.
Step 2: Put the home page URL into the search field and press the start button.
Step 3: Head over to the page title and description tab. Here is how it will look.
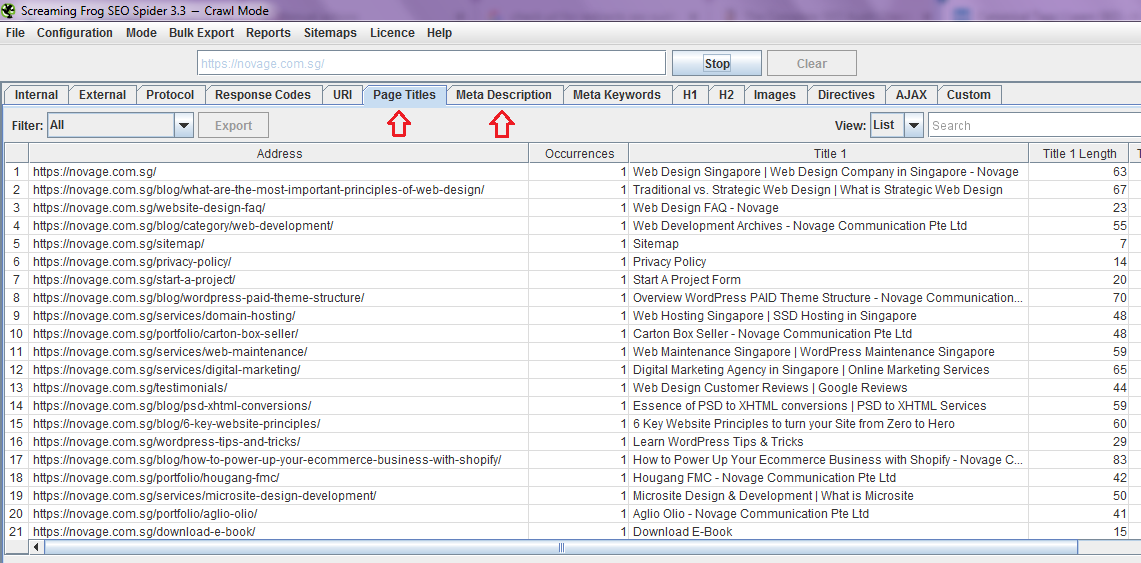
Step 4: Check every page and its title. You can sort the URLs by using different filters located on the left top corner.
Step 5: Choose the filter “Missing”, it will show you the entire website URLs that don’t have title text. Click on export to grab all these links on a spreadsheet.
Step 6: Place title text within the Meta title tag and upload it.
Step 7: For Meta description, you need to do the same thing, sort the URLs by using “missing filter” and export the spreadsheet. Now, write down the description text for every URL and place them one by one.
-
Remove duplicate Meta title and description tags
Missing title and description are indirectly harmful to a website but the duplicate title and description is directly harmful to a website. Google hates duplicity, thus it is very necessary to find out the duplicate title and description texts and fix them.
For that you can follow these simple steps:
Step 1: Run Screaming Frog tool and put your home page URL then hit the start button.
Step 2: Now go to title tab and choose the filter “duplicate”. It will show you all the URLs that have the duplicate title, export them all on a spreadsheet and replace the duplicate title with new ones. (You can easily do it via your site’s back panel or CMS)
Step 3: To find duplicate descriptions, go to the “Description” tab, choose the filter “duplicate” then export all URLs. Now replace duplicate descriptions with new ones. (Again, you can easily do it via your site’s CMS)
-
Make sure HTML header tags are proper
HTML header tag plays a significant role in content formatting of a web page. Through these header tags, you can display information clearly for both search engines and users.
There are six header tags available from H1 to H6. You need to check whether these tags are available on your website or not.
You also need to check whether they are organized properly.
You can again use Screaming Frog tool to check for header tags. Follow these steps:
Step 1: Go to Screaming Frog tool and enter the home page URL of your website and press the start button.
Step 2: Now head over to H1 tab, here you will see all pages with and without H1 HTML header tag.
Step 3: Apply the ‘missing’ filter to see pages without H1 header tag, export the list for further use.
Step 4: Put H1 header tag with your focus keywords on appropriate pages.
Note: Make sure that H1 tag appears first on a webpage then H2, H3 and so on (if you want to place them). Also, there should be only one H1 tag present on one page.
-
Check for URL structure
URL structure of a website is another significant SEO audit step that you should focus on. Hard to read URLs can damage the user experience of your website, on the other hand, easy to read URLs can improve the user experience of your site.
Let’s understand it in detail by this example.
Check out the URL of “Shawshank Redemption” movie listing at IMDB and Rotten Tomatoes.
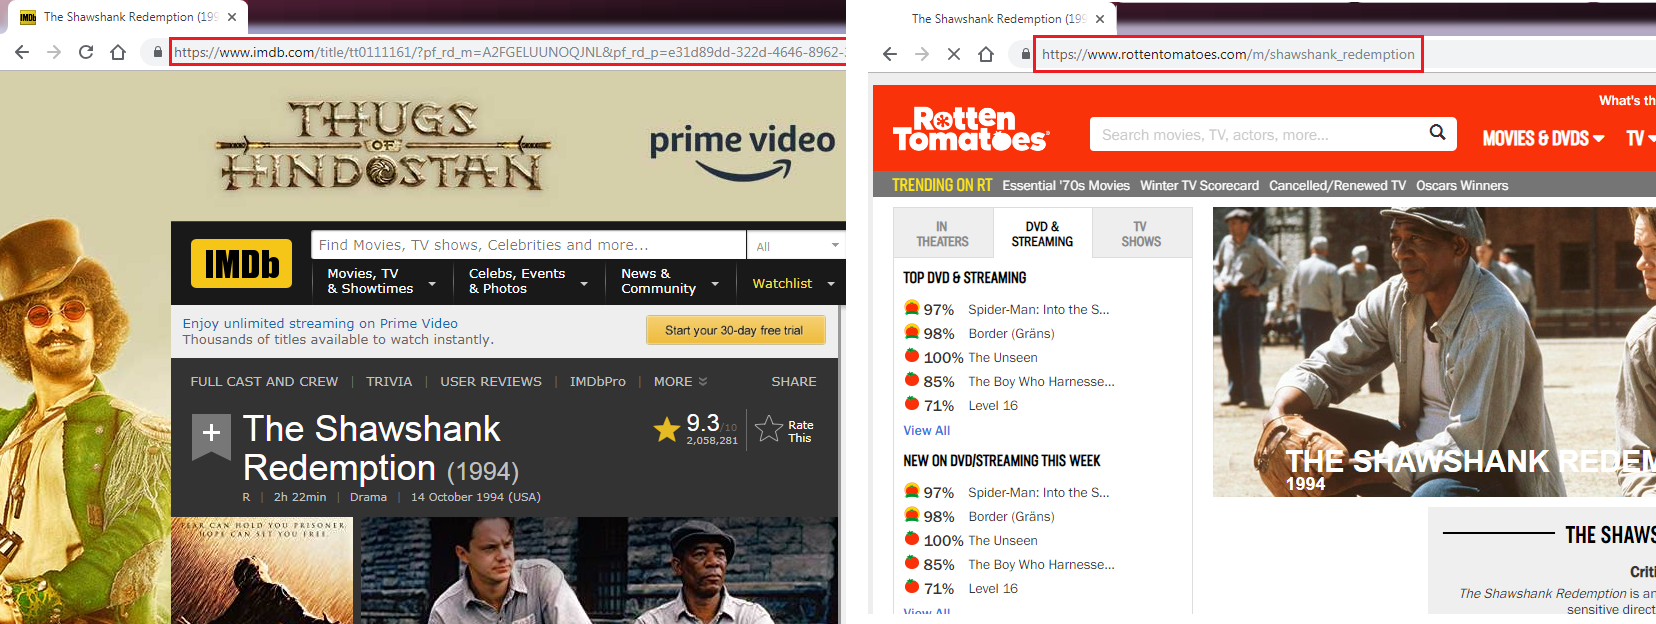
Did you see the difference?
The URL structure of Rotten Tomatoes is better than IMDB, why? Because it’s more human friendly, when a user sees the URL he can clearly understand what he is going to see when he clicks on it
This is why it’s important to check whether your website URLs are user friendly. If you find unfriendly URLs on your website then you should make those URLs human friendly by inserting the right keywords and relevant phrases.
-
Make sure your website architecture is clean and simple
The whole purpose of website architecture is to serve information smoothly to users. If your website architecture is bad then users will not feel comfortable finding the information.
Let’s say you want to buy running shoes, so you visit Amazon and look for the menu. You don’t see it at the top of the website, you scroll down, scroll down some more, then reach the footer. Now you see it, the menu is located down there at the bottom.
Will it make you happy? No.
It has become an industry standard to put the menu bar the top of the homepage so that users can easily reach it and browse the pages. If you place it in the footer, users will have to make efforts to locate it, users don’t like that.
This is just one example, there are many other things that fall under website architecture such as cart placement, logo placement, fonts, font size, menu structure etc.
These things need to be taken into account to make sure that your website architecture is clean and simple for users.
-
Remove unnecessary pages
You might have seen every website has got some unnecessary pages. These pages are either created by you or by your website’s CMS.
In the past, you may have created some blog posts or pages with thin quality content and information that is outdated now.
These pages don’t bring any traffic, instead, it degrades your website’s authority because these pages don’t add value.
Sometimes, your website’s CMS also creates pages that you don’t need or want them to rank such as tag pages, search result pages category pages, archive pages etc.
If you see these pages are adding no value to your website and Google search results then you should remove them.
This is a serious job because you need to deeply evaluate the real value of every page, then only you will be able to decide whether to keep the page or delete it.
-
Check for Image ALT attributes
Search engines can distinguish the difference between images. However, they can’t understand the subjective identity of images.
Therefore, it is important to optimize the images via the image alternative tag. For better optimization, you should put focus keywords + descriptive phrases into img alt tag.
For example, if you are writing an article about companies that sell SEO services in Singapore and using a featured image, then you should write alt attribute text like “how to find the right SEO services in Singapore”.
See, the whole phrase is self explanatory; it includes the keyword + description so that search engines can understand more about your image.
To check for missing image alt attributes on your website, you can again use Screaming Frog tool. Follow the steps for doing so.
Step 1: Put the home page URL in Screaming Frog search bar and hit Start.
Step 2: Go to image tab to see all the images of your website.
Step 3: Choose filter “Missing Alt text”. Now you will see all images without img alt attribute
Step 4: Export the sheet, by pressing the export button.
Step 5: Now, place relevant and descriptive text in img alt attribute. (You can easily do it via website CMS)
-
Make sure your site rank for your brand name
Another step of this SEO audit is checking your brand keyword ranking on Google. You can do it by searching your brand name on Google.
If your website appears first on SERP for the branded keyword then you are good.
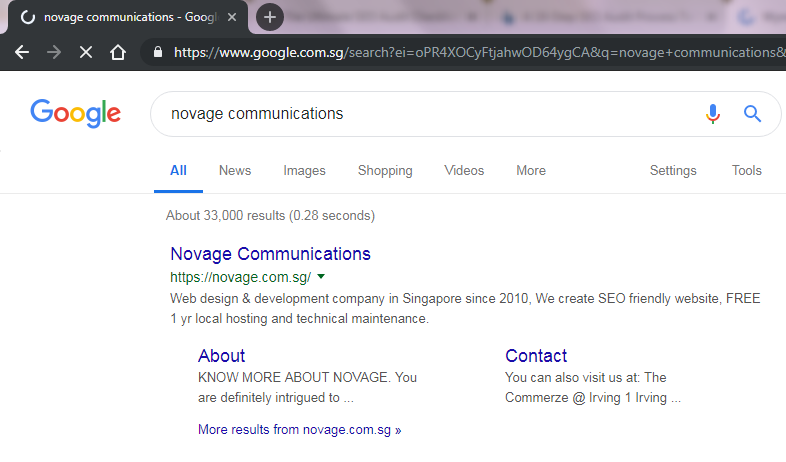
If not, then you have to work hard to improve brand visibility. Because if your website is not ranking for the branded keywords then it simply means that Google is thinking some other website provides better results for this search query.
Such a situation also arises, when you use a generic word as your brand name. Many businesses target such generic terms in their SEO strategy and so it becomes difficult to rank for those terms.
So, if your website is not ranking for your brand name then you need to build a lot of backlinks on your brand anchor texts. You also need to work on building your brand, for that you need to list your business with the brand name on different high quality citation sites.
Besides, try publishing press releases on different PR media sites to improve brand visibility. Also, you should create your business accounts on social media websites.
These tasks will help your brand get more search visibility and eventually your website will start ranking for your brand name on Google.
-
Check for Robots.txt file
This is a text file placed in the root folder of your website. This file is used for giving instructions to search engines bots. You should ensure that your website has a robots.txt file.
If your site doesn’t have a robots.txt file then you should create one and upload it to the root folder.
The basic syntax of this file looks like this:
User-agent: *
Disallow: /directory or page/
Allow: /directory or page/
Sitemap: https://example.com/sitemap_index.xml
In this file * denotes to all search engine bots, the “disallow attribute” tells search engines to not crawl a page or directory.
While “allow attribute” instruct search engines bots to crawl a specific page or directory. You can also place your XML sitemap URL for search engine bots’ convenience.
After updating the Robots.txt file, test it with Google’s Robots testing tool to make sure that the syntax is fine and working perfectly.
-
Check for outgoing broken links
A broken outgoing link is harmful, it misleads the users as it takes them to non-existing pages. This certainly degrades the user experience, which you don’t want for your website.
Thus, you should check all the broken links within your website. I know it is a hefty task, especially if you have hundreds of pages on your site.
But you don’t have to be worried, there is a great Google Chrome extension called “Check My Links”. With help of this tool, you can easily check outbound links that are broken on a particular web page.
After you find broken links, you should fix them by placing relevant outbound links or internal links.
-
Check for inbound broken links
Broken inbound links are also harmful, to be precise, such links are more harmful than broken outbound links.
With help of inbound links, your website gets traffic and link juice from different sources & if your site has broken inbound links then you are losing both.
So, time by time you should check the inbound link profile of your website to find broken links. For that, you can use Ahrefs broken link explorer, this tool is easy to use and within minutes you will have the report for all the broken links.
After you find all the broken links, you should make efforts to build them. Here is a detailed article that explains A to Z about broken link building.
-
Ensure that XML sitemap is placed on the site
XML sitemap is the index of your website which makes it easy for search engine crawler to crawl your website thoroughly. It also helps Google to understand your internal link structure and discover new pages.
If you have an XML sitemap then good, but if you don’t have it then you should create one. There are many online tools that can help you create a sitemap such as XML-sitemaps, Small SEO Tools etc
After creating the sitemap you should upload it to your website, also you should submit it to GSC (Google Search Console).
Follow the simple steps for doing this:
Step 1: Go to Google Search Console.
Step 2: On the left sidebar, look for the option sitemaps and click on it.
Step 3: You will see an option of adding a new sitemap, here enter the path of the sitemap you uploaded to your website and hit submit button.
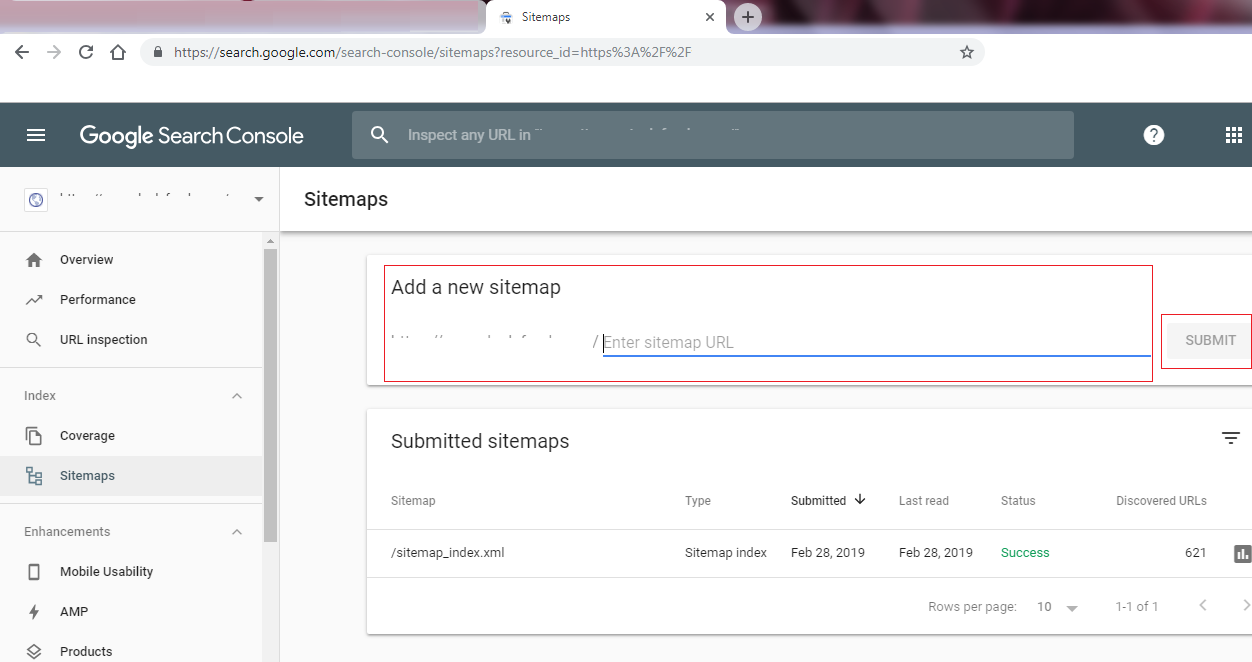
Submitting your sitemap to Google Search Console is important because then you can track the search performance of every URL in Search Console.
Also, if there is an issue arises then GCS tool sends you a message to fix it.
-
Confirm website load speed is good
This is a very important step in an SEO audit. It has been a while since Google included website load speed as a ranking signal into its algorithms. Also, fast loading websites provide better user experience compared to slower ones.
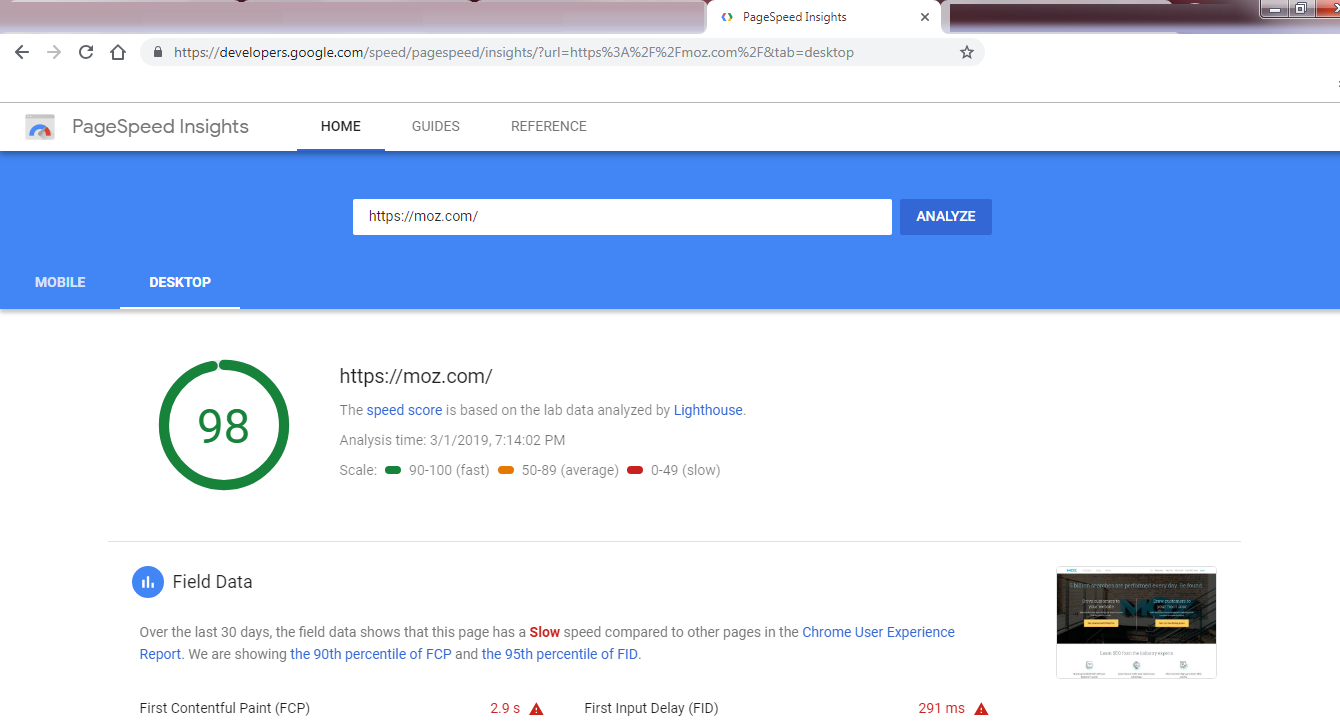
Considering both facts, you must pay attention to how your site is loading. For that, you need to check your website’s speed via tools like GTmetrix and Google Page Speed Insight.
These tools will tell you how your website is performing when a user visits it. Not just that, Google Page Speed test will also tell you how you can fix the errors.
-
Make sure you don’t use flash on your site
In July 2017, Adobe announced that by 2020 it will stop supporting flash. Since flash is not web friendly and slows down the website, millions of webmasters have already removed flash content from their websites.
If you by any chance are using flash on your website, remove it.
Having flash on your site will never let you achieve the goal of a faster site because flash content is heavy and takes too much time to load.
-
Check for structured data mark-up errors
You must be using structured data mark-up on your website. It is the additional information that search engines use to understand the content of your website.
You should check whether the mark-up you applied to your webpage is correct. You can easily do it by testing your website through Google’s structured data tool.
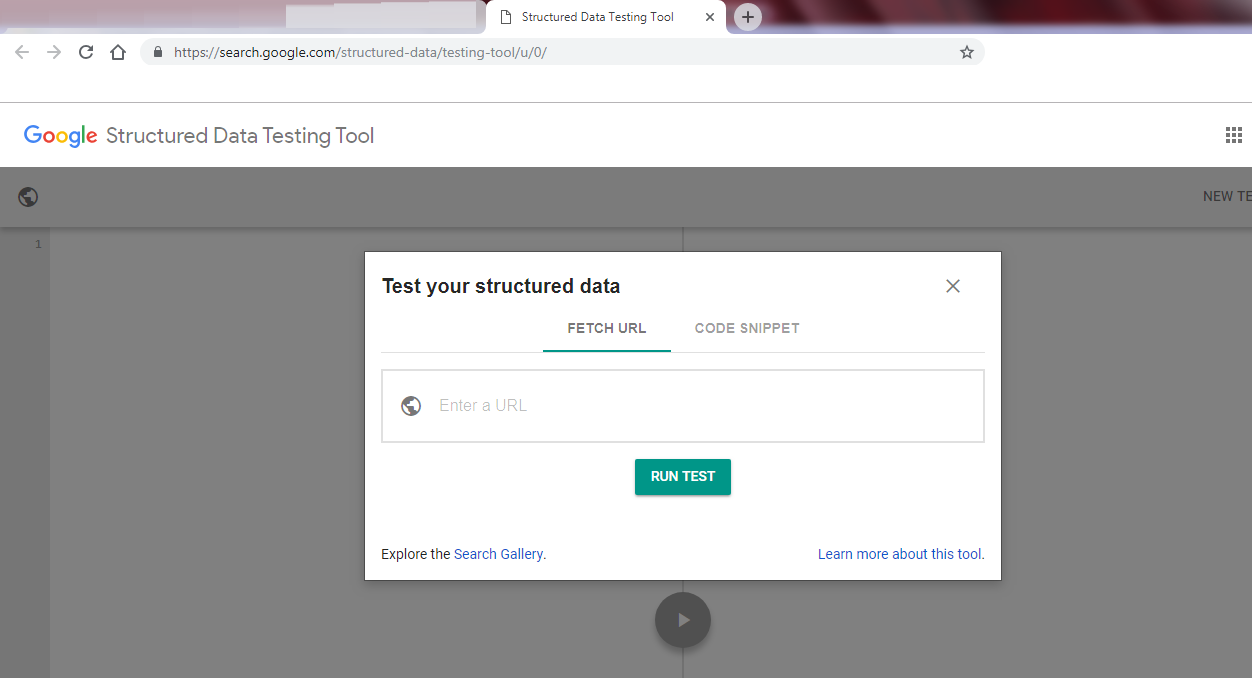
As you can see in the image above, there are two options to test your site for structured data. Either you can enter the URL of the page or you can insert the mark-up code from your website.
Structured data mark-up is an advanced SEO method, so it is not possible to explain it completely here in this article.
But if you want to learn more about it then you can visit Google’s structured data guide, this guide explains how mark-up works, how to implement it and validate it.
-
Check for mobile responsiveness
The web is responsive these days, neither Google nor users like static websites. Most of the users access the web on their smart-phones, that is why it is important to make your website mobile friendly.
To check the mobile-friendliness of a website you can use the tool from Google, Mobile friendly test. After testing, if you find your website not mobile friendly then you should make it responsive for all devices.
Also, you can check the additional resources provided on the tool’s dashboard to get more knowledge on how to make your site friendly for mobiles, desktops and tablets.
-
Check the backlink profile
Backlink profile is a strong ranking signal and a vital way to get referral traffic. Also, backlinks pass the link juice which improves your site’s authority. Hence, it becomes very important to check the backlink profile of your website.
For that, you can use tools like Ahrefs, Moz site explorer etc.
If you see that your website’s backlink profile is poor then you should invest an immense amount of time and efforts into making it strong.
Backlinks are the core of SEO (yes, they still are) and neglecting them will cost you a lot.
To learn how to improve the backlink profile, check these content curation tactics.
-
Analyze the keywords
Keywords are very important for a website. Without having the right keywords in mind it is very difficult to build a fruitful SEO strategy.
Thus, you should check whether the right set of the keyword is present on your site. You should think whether keywords placed smartly, is the keyword proximity good?
If not, then you should start again and analyze the different keyword sets then pick the right ones. To discover the keywords you can use Google’s Keyword Planner or Neil Patel’s UberSuggest.
Both tools are great and tell you a lot about the search term. It also shows many other metrics like related terms, search volume, ranking difficulty, paid search competition etc.
These metrics help you choose the right keyword for your website.
The Final Word
As I said at the beginning of this guide, every website has its own need and depending on that the purposes of SEO audit change.
So, you should first understand the need of your website then perform this SEO audit. Also, I would suggest you doing the audit thoroughly. Partially auditing the site will solve some of the issues of your site but not all.


